

How to Set up an Email Service in Rust
A guide to building a minimal email service in Rust Using The Axum framework


Table of contents
Hey there 👋,
The following content is an extract (and documentary) of a project I'm currently working on. I hope to put together bits I've picked up on my journey, learning Rust, as well as one of its web frameworks; Axum.
Overview
Ermm, So what is Rust?
Rust is a modern systems programming language that promises to empower software developers to write fast and memory-safe applications.
Axum, on the other hand, is a Rust web application framework, think of it as Django to Python or as Laravel to PHP.
An email service is a backend component responsible for parsing and sending emails to users.
In the following sections, I'll go over how to set up a minimal service that will dispatch email. You can take a quick look at the finished code here
Let's head right into it 🚀
Requirements
Since this is a Rust application guide, it is only appropriate to have Rust (and its toolchain) duly installed on your machine. If not, let's have a quick look at Rust Installation Guide
Welcome back, now we can go on with other things. The other requirements are:
cargo-watch - A package that will watch our codebase and restart each time changes are made.
SMTP username and SMTP password: For prototyping, I'll be using Gmail SMTP and App Password, you can learn more about App Passwords as well as check out a guide on how to set up App Password.
Finally, A text editor and some familiarity with the terminal are needed.
Project Setup
We'll start by creating a new Rust binary application and then navigate to the directory in our text editor for further things
# create a new rust project
cargo new rust-axum-email-server
#navigate to the project directory
cd rust-axum-email-server
#fire up the server
cargo run
The previous command will create a new Rust project, navigate to the project directory and run the application.
If everything is properly setup, you should have an output similar to the one below in your Command Line Interpreter
[Running 'cargo run'] Compiling rust-axum-email-server v0.1.0 (/home/drizzle/devs/email-server) Finished dev [unoptimized + debuginfo] target(s) in 0.56s Running target/debug/rust-axum-email-server Hello, world! [Finished running. Exit status: 0] [Running 'cargo run'] Finished dev [unoptimized + debuginfo] target(s) in 0.00s Running target/debug/rust-axum-email-server Hello, world! [Finished running. Exit status: 0]
We can go on to install our project dependencies:
From the project root directory, run the following commands.
#install dependencies
cargo add axum tokio -F tokio/full lettre serde -F serde/derive dotenv
What do we have going on here!? 🤯
Rust allows us to include only the required features of our application dependencies by specifying -F <crate>/<feature>. To this end and from the command above, we are pulling in:
Axum, our web framework, in all its glory
the full feature of tokio, an asynchronous runtime for Rust
the lettre crate, a mailer library for Rust
the derive feature of serde, a crate for parsing JSON,
dotenv for parsing environment variables in the development
At this point, Our application manifest (Cargo.toml) would look like this
[package]
name = "rust-axum-email-server"
version = "0.1.0"
edition = "2021"

[dependencies]
axum = "0.5.16"
dotenv = "0.15.0"
lettre = "0.10.1"
serde = { version = "1.0.144", features = ["derive"] }
tokio = { version = "1.21.1", features = ["full"] }
Build
With the setup out of the way, the way, let's begin the real deal. Navigate to src/main.rs and replace the content with the following listing
use axum::{response::Html, routing::get, Router};
use std::net::SocketAddr;

#[tokio::main]
async fn main() {
    // build our application with a route
    let app = Router::new().route("/", get(handler));

    // run it
    let addr = SocketAddr::from(([127, 0, 0, 1], 3000));
    println!("listening on http://{}", addr);
    axum::Server::bind(&addr)
        .serve(app.into_make_service())
        .await
        .unwrap();
}

async fn handler() -> Html<&'static str> {
    Html("<h1>Hello, World!</h1>")
}
The snippet is an extract of axum hello-word example.
We started by importing the required modules from Axum as well as the SocketAddr module from the Rust standard library, the SocketAddr is an IP address builder. And we are using it to construct the localhost IP address as seen here rust let addr = SocketAddr::from(([127, 0, 0, 1], 3000));
Finally, we are passing the address to our Axum server instance. rust ... axum::Server::bind(&addr) .serve(app.into_make_service()) .await .unwrap();
Axum uses the word handler to connote what we typically call controller in a framework like Node's Expressjs.
Controllers, (or handlers) are essentially functions or methods that accept and parse our HTTP requests, as well as process them to return an HTTP response.
So far, our server has one handler mounted to the base route as seen below. defined in the code listing: let app = Router::new().route("/", get(handler)); The route will print Hello World once you visit this route https://127.0.0.1:3000 in your browser. Lets' go on to create a handler for dispatching our emails. Just before we do that, we need to create a .env file to hold our environment variables.
...
#create a .env file
touch .env
Populate the .env file with the following fields and their corresponding values
 #the SMTP username, typically the full email address
 SMTP_USER=example@mailer.com
#the SMTP password
SMTP_PASSWORD=shhhh
# SMTP host
 SMTP_HOST=smtps.mailer.com
Now, let's head over to src/main.rs to create our handler, once we do, we will mount the handler to a route. To do that, replace the content of src/main.rs with the following listing, taking note of the comments and the added snippets. I'll explain what we have going on shortly.
use axum::{
    response::{Html, IntoResponse},
    routing::{get, post},
    Json, Router,
};
use dotenv::dotenv; // import the dotenv crate for parsing the `.env file`
use serde::{Deserialize, Serialize};
use std::env; //for getting fields from the environment
use std::net::SocketAddr; // import serde for parsing our struct to and from Json
                          //import the email library needed modules
use lettre::transport::smtp::authentication::Credentials;
use lettre::{Message, SmtpTransport, Transport};

/// define a structure that maps to the format of our HTTP request body
/// derive the Debug trait, this will allow, printing the struct in stdout
/// derive the Serializing trait, this will allow building up JSON
/// derive the Deserializing trait
#[derive(Debug, Serialize, Deserialize)]
struct EmailPayload {
    fullname: String,
    email: String,
    message: String,
}

//mount the tokio runtime to allow our main function to support asynchronous execution
#[tokio::main]
async fn main() {
    dotenv().ok();
    // build our application with a route
    let app = Router::new()
        .route("/", get(handler))
        //mount the handle to a path, using the HTTP POST verb
        .route("/send-email", post(dispatch_email));

    // run it
    let addr = SocketAddr::from(([127, 0, 0, 1], 3000));
    println!("listening on http://{}", addr);
    axum::Server::bind(&addr)
        .serve(app.into_make_service())
        .await
        .unwrap();
}

async fn handler() -> Html<&'static str> {
    Html("<h1>Hello, World!</h1>")
}

/// define an email handler, the handler will take the user's email address and the message body
/// the parsed payload will be fed into the `lettre` library and finally, a response will be returned
async fn dispatch_email(Json(payload): Json<EmailPayload>) -> impl IntoResponse {
    // println!("{:#?}", payload);
    //destructure the HTTP request body
    let EmailPayload {
        email,
        message,
        fullname,
    } = &payload;

    //contruct emil config
    let from_address = String::from("You <you@yordomain.com>");
    let to_address = format!("{fullname} <{email}>");
    let reply_to = String::from("You <you@yordomain.com>");
    let email_subject = "Axum Rust tutorial";

    let email = Message::builder()
        .from(from_address.parse().unwrap())
        .reply_to(reply_to.parse().unwrap())
        .to(to_address.parse().unwrap())
        .subject(email_subject)
        .body(String::from(message))
        .unwrap();

    let creds = Credentials::new(
        env::var("SMTP_USERNAME").expect("SMTP Username not specified "),
        env::var("SMTP_PASSWORD").expect("SMTP Password not specified"),
    );

    // Open a remote connection to SMTP server
    let mailer = SmtpTransport::relay(&env::var("SMTP_HOST").expect("SMTP Host not specified"))
        .unwrap()
        .credentials(creds)
        .build();

    // Send the email
    match mailer.send(&email) {
        Ok(_) => println!("Email sent successfully!"),
        Err(e) => panic!("Could not send email: {:?}", e),
    }
}
Explanation
- I started by importing the required modules from each crate
...
use dotenv::dotenv; // import the dotenv crate for parsing the `.env file`
use serde::{Deserialize, Serialize};
use std::env; //for getting fields from the environment
use std::net::SocketAddr; // import serde for parsing our struct to and from Json
                          //import the email library needed modules
use lettre::transport::smtp::authentication::Credentials;
use lettre::{Message, SmtpTransport, Transport};
...
- I defined a struct to represent the HTTP request body payload, this is required by Axum Extractor which is basically parsers that help to extract values from the HTTP request
paramsandbody, to mention a few.
...
#[derive(Debug, Serialize, Deserialize)]
struct EmailPayload {
    fullname: String,
    email: String,
    message: String,
}

...
- I initialized the
dotenvcrate to allow parsing environment variables in development, then I mounted the route handler to a/send-emailroute using thepostthe method from Axum since the server expects a request
...
    dotenv().ok();
    // build our application with a route
    let app = Router::new()
        .route("/", get(handler))
        //mount the handle to a path, using the HTTP POST verb
        .route("/send-email", post(dispatch_email));
...
The concluding part is basically, plugging in our environment variables, parsing our HTTP request payload and dispatching the email, and printing the response in the console.
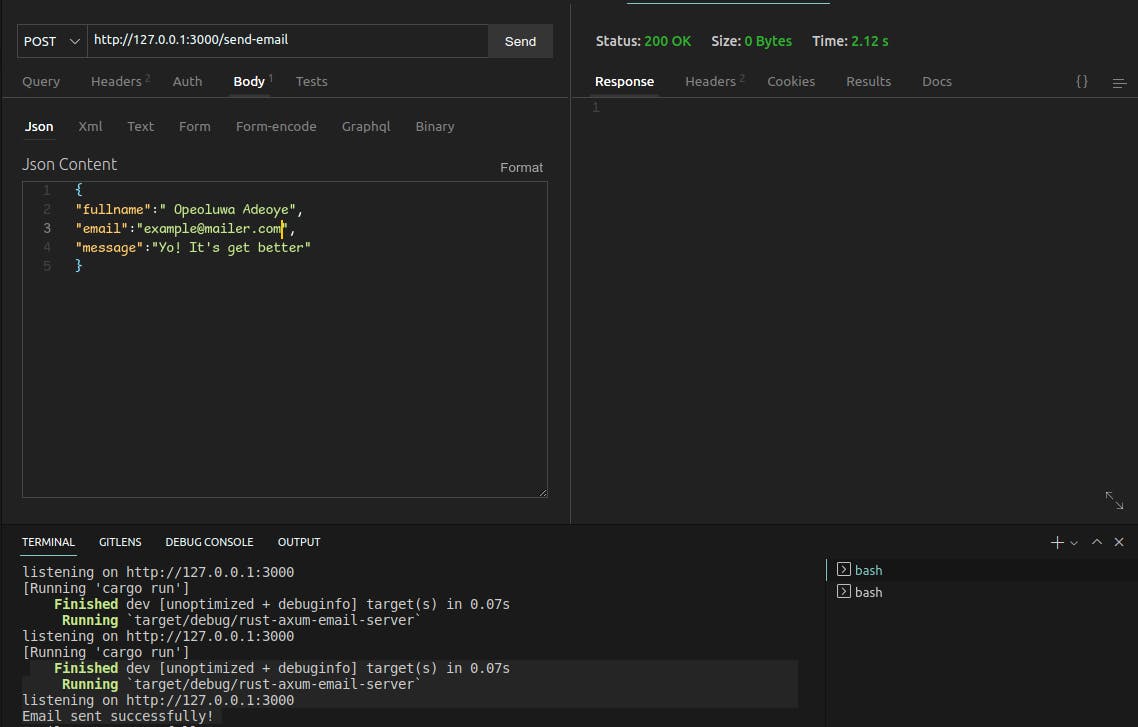
Test
For the test, you can use any HTTP client you are comfortable with, the commonest are Curl and Postman.
However, I find Thunder Client more convenient to use, since It's a VS Code extension. This means I can do everything in the comfort of my editor.
And that's pretty much it, thank you for sticking to the end. I'd love you to read about my other adventures